Wednesday, 4 February 2015

Brittany Angell's Every Last Crumb is a Masterpiece

After seeing all the rave reviews of Brittany Angell's Every Last Crumb, I had to check it out for myself. This book definitely deserves all the fantastic press it's getting.

This book is beyond gorgeous. Brittany poured her heart and soul into the recipes and you can really tell. The design is seriously droolworthy, the instructions well laid out and easy to follow, and the recipes absolutely irresistible. I found myself marking-up nearly every other page as something to try - everything looks so good (I'll be honest here - it would have been every page, but my waist can't afford that kind of eating!)

Recipes range in complexity from the simple 5 minute mug cake (delicious!) to time consuming croissants (that look so, so, so very good - croissants were my favourite treat before I was forced to go gluten-free). We have tried a number of recipes (the naan, the mug cakes) and they have all turned out well. Next on the list of things to try (though they will have to wait until the weekend): the bagels, the cinnamon rolls and the croissants!

Heads-up: You will need a scale to cook most recipes. Not all recipes are paleo (rice flour is used) which didn't bother me since I'm gluten-free, not paleo.

Bottom line: the recipes will make you drool - don't flip through this beauty on an empty stomach!

(Disclaimer: I borrowed this from the library. Three weeks with "Every Last Crumb" is not enough - I will be purchasing a copy of my own very soon!)

Tuesday, 13 January 2015

Cooking up a storm: My Favourite Cookbooks in 2014 and the One's I'm Eagerly Awaiting in 2015

I have been woefully remiss about posting here of late! In fact its been a full year since I've posted a single thing on here. The truth? I've been busy cooking up a storm (less baking and more healthy everyday meals). I've received so many beautiful cookbooks in 2014 and been devouring the recipes peppering the pages.

2014 was a great year, though busy, full of life milestones. I left the corporate world to work on my own start-up, got married and finally got my very own spiralizer which I will be playing with in 2015.

Check out my Rascal trying out the dress, post- wedding!

I resolve to be better in 2015. I will share more of my "everyday", "boring" recipes and I won't wait for baking masterpieces to inspire me.

What were some of my favourite cookbooks in 2014?

My Darling Lemon Thyme:

This was hands down my favourite cookbook of 2014 (as a dedicated blog follower and recipe tester for the pecan pie recipe I even paid more to get it from fishpond when it wasn't yet available on amazon)! I think there are more recipes in this book that I have cooked than those I have not.

Its hard to pick a favourite recipe from this book as I've loved and repeated almost everything I've tried. Where to start? We've tried the millet + linseed porridge with orange prunes, sweetcorn and basil fritters (made this several times and love it, great with soup and great on their own too), the carrot, cumin & red lentil soup with coriander pesto (the soup is amazing, the pesto is too - we've made both together and separately too), the buckwheat tabouli, the brown rice salad w spice roasted carrots ( really a crowd pleaser), the quinoa & lemon anzac biscuits (didn't last even an hour, they were that good), the salted caramel popcorn, the spiced pumpkin, date & quinoa muffins, the spice-roasted vegetables w/ chickpeas, millet and chermoula (great flavour combo, my guests went wild for this), the peanut brown rice patties (have done with peanuts and with cashews - both were great), the pizza (good, but not the best I've had so wont replace my go-to recipe from the Artisanal Gluten Free Cooking cookbook), the chickpea falafel wraps (so good), the red lentil dhal, the lentil spaghetti (great way to add protein to your veggie pasta), the stuffed capsicums, the chocolate avocado tart (so good and velvety, guests will love this and wont know its healthy, bonus its so easy to make - I've made this as mousse too and made it minty with the addition of mint liquor), flourless dark chocolate cardamom cake (fantastic), the pecan maple tart (too sweet for my tastes, but those that actual like pecan pie will enjoy, one of the best gf pie crusts I've tried).

At Home in the Whole Food Kitchen:

This is a gorgeous, well put together addition to my cookbook collection.

The first ~50 pages of this book are dedicated to tools, equipment, ect, followed by some 'essential' recipes (how to cook various grain and beans, make nut & seed milks, toast nuts & seeds and roast vegetables) and pantry recipes ( simple recipes some of which would count as great meals for me, condiments and ferments). Here's where it starts to get interesting in Part 2: The Recipes. The pages that follow are peppered with interesting, inviting and overall appealing recipes.

So far we have tried the creamy cauliflower and celery root soup with roasted shitakes garnish (simple in prep, but gourmet results) which everyone loved, fragrant eggplant curry with cardamom-infused basmati rice and tangy apricot chutney (good flavour mix, I reduced the amount of tomatoes by half) the tempeh portobello burgers (amazing... these were so, so, so good though a little hard to shape - I will make them again and again...), and the beet chickpea cakes (which according to the husband tasted like 'Christmas in his mouth', but were again hard to shape).

By warned that portion sizes must be massive because we had a substantial amount of leftovers for most recipes (which was a great thing).

Yum Universe

This is without doubt a beautiful cookbook. Prospective buyers should be aware that Heather dedicates the first half of the book (~150 pages or so) on tools, pantry, benefits of a healthy, gluten-free plant-based lifestyle, techniques and more.

Favourites so far: Heather's versatile Chickpea Flatbread (was great as a pizza crust and delicious on its own too), Black Bean Soup (simple, but satisfying) and a few more. Recipes are easy to follow, relatively quick (though one should read recipes in advance as some call for soaking/cooking of legumes or nuts) and well illustrated. Ingredients are accessible (nothing really out there).

Overall a great new cookbook. I love Heather's blog and I love her book.
 
 
I am steadily cooking through this book and have already made the out-the-door chia power doughnuts (the one fail so far as they were too gummy for my tastes), the on the mend spiced red lentil-kale soup, crowd-pleasing tex-mex casserole (yum though those who don't appreciate spice might want to reduce the amounts of chili powder and cayenne), the enlightened miso power bowl (an easy, healthy meal great to start the year with), the classic glo bar (easy, fast and so, so good) and the salt & vinegar roasted chickpeas (these could easily get addicting!). I have dozens more bookmarked to try (Indeed I have a date with Angela's Chakra Caesar salad and nutty herb croutons tonight).

Recipes are easy, ingredients are easy to find and Angela gives prep and cooking time guidelines which I find very helpful. The layout is great (most recipes are accompanied by full colour photos, but the spine doesn't stay flat which makes it hard to read when cooking. As I have seen a lot lately in the books this year (or last I suppose), Angela has included a section on her pantry. Book is broken down by breakfast, smoothies, juice & tea, appetizers, salads, soup, entrees, sides, power snacks, desserts and homemade staples.

Books I Can't Wait to Cook From!

In 2015 I am eagerly awaiting the Sprouted Kitchen's second cookbook: The Sprouted Kitchen Bowl and Spoon, My New Root's debut cookbook and the Urban Poser's My Paleo Patisserie. I am also excited for follow-up cookbooks from the Art of Gluten Free Baking (I was a recipe tester and I KNOW how excited you should all be to get this!!!) and La Tartine Gourmande.

Sunday, 12 January 2014

Saucy Quinoa-Squash Wraps for the New Year

Ever since I returned from my three week long winter holidays overseas, I have been craving fresh vegetables like crazy. 

On vacation (like most people), I ate a ton more starch than normal with a diet heavy on delicious gluten-free perogies and potato dumplings, but quite low on green vegetables. As a result, my body is now crying out for a reset and a return to lush veggies and simple, but satisfying meals.
 
Its been hard to fit in experimentation in the first week back to work (I tend to subsist more on hearty salads than anything else) so I had to wait until the weekend to make these.

I have to say that they are worth the wait.

These wraps are filled with flavours: sweet cranberries and roasted squash, toasty sunflower seeds, and sultry sundried tomatoes all in one pretty package.

I was planning on using collard greens in place of wraps but had surprise company last minute and decided on serving something more substantial instead. I tried these (to the right) coconut wraps for the first time and they were pretty awesome (they did not toast well however - so if you go this route forgo toasting your wrap)! 

In the new year, I will be focusing on eating fresh, simple foods.  Real food tastes amazing and doesn't have to be complicated :)

Happy New Year Everyone!  
 
Saucy Quinoa-Squash Wraps

Wraps of choice

Sundried Tomato, Sunflower Sauce:
1/4 cup sundried tomatoes (dried, soaked in boiling water for 15 minutes)
3 tbsp water reserved from soaking sundried tomatoes
2 cloves garlic
1 tsp ginger grated
1 tbsp sunflower seed butter

To make sauce:
  1. Blend all ingredients in a mini food processor until smooth.
  2. Add more water if needed.

Filling:
1 cup quinoa (soaked in water for at least 30 minutes)
1/2 cup coconut milk (canned)
1 1/2 cup butternut squash, diced in 1/2 inch cubes
1 cup Kale, shredded
1 cup cooked chickpeas
1/4 cup dried cranberries
1/4 cup sunflower seeds, toasted
olive oil 
salt

To make filling:
  1. Preheat oven to 400 degrees
  2. Cook quinoa according to package directions, replacing 1/2 a cup of required water with coconut milk (I usually use a 2:1 ratio of liquid to quinoa and cook covered for an initial 15-20 minutes before turning off heat and letting stand covered for an additional 15 minutes).
  3. Toss butternut squash in 1 tsp of olive oil and a pinch of salt.
  4. Spread evenly on a baking tray and bake an initial 15 minutes.
  5. Meanwhile, massage shredded kale with 1/2 tsp olive oil and 1/4 tsp salt.
  6. Remove squash from oven and turn cubes over so they bake on both sides. Add kale to baking tray and bake for an additional 8 minutes.
  7. Mix all filling ingredients together.
 To assemble:
  1. Toast wrap if desired
  2. Spread sauce over middle portion of wrap
  3. Add filling over sauce
  4. Roll up and serve

Sunday, 22 December 2013

A long awaited update and some banana bread


In between starting a new job and life in general there hasn't been a whole lot of time for blogging. There has indeed been experimentation in the kitchen, some holiday baking and delicious recipes all around, but I admit that I haven't found the time to snap the right shots or take proper notes to share with you.

On vacation now in Poland and things have slowed down considerably. It is a lot harder to find the flours I'm used to and so I have had to do a ton more experimentation. Today I made a tasty banana loaf filled with pistachio nuts and chunks of chocolate. I admit that I have been cheating and added eggs back in to my diet while here in Poland. So far, I haven't experienced any ill effects, but I will try this with a flax seed egg when back in Canada and see how it holds together.

I didn't have measuring cups available to me so these measurements are eyeballed, but the results were so good I had to share right away. I will try to test this again and update with any changes when I am back in Canada.

Buckwheat-Amaranth Banana Bread

Preheat oven to 350 degrees

Mix together dry ingredients:
1/2 cup amaranth flour
1/4 cup buckwheat flour
1/2 cup rice flour
1/2 cup potato starch
1/2 cup sugar
1/2 tsp salt
1/2 tsp baking powder
1/2 tsp baking soda
1 tsp cinnamon

Mix together wet ingredients in the following order:
2 eggs, beaten
1/3 cup olive oil
2 bananas, mashed
1 tsp vanilla

Mix wet ingredients thoroughly with dry

add in:
~1/4 cup chopped pistachios
50 grams of dark chocolate (or more to taste), chopped coarsely

Bake for 35-40 minutes


Thursday, 14 November 2013

Protein Packed Peanut Butter Squares!

Since learning I can no longer eat almonds, I have been forced to give up my favourite protein bars of all time - the Elevate Me Bar. I used to take these bars tucked in my purse whenever I left the house. Vacations in places where Gluten Free options are less available usually meant I took a case or two whenever I traveled.  

Unfortunately, I've since discovered that most protein bar options are either gluten-free or almond-free but not both (or they just taste awful ha). One exception has been the Quest Chocolate Peanut Butter Protein bar, which upon me finding it, promptly disappeared from stores nearby.

To top it all off, this week I ran out of my Vega protein powder and was unable to restock as it seems there has been a recall on the product.

This all must be a sign for me to stop procrastinating and begin developing my very own protein bars. The day I share protein bars with you will not be today however.

Sadly, after making these (my first attempt), I discovered that the protein content was probably too low to qualify as a protein bar. They do however make a delicious protein packed square.

The picture is not that great, but they are awesome so I urge you to try them!

Protein Packed Peanut Butter Squares

Ingredients:
10 medjool dates, pitted
1/2 cup peanut butter
1 cup coconut milk
1 chia egg (I used 1 tbsp hulled to 3 tbsp water simply because I couldn't find my whole seeds)
1/2 cup whey protein powder (I used New Zealand Whey)
1/4 cup hemp seeds
1/2 cup sweet rice flour
1 tsp baking powder
60 ounces dark chocolate, chopped

  1. Preheat oven to 350 degrees
  2. mix dates in food processor until smooth
  3. In stovetop over medium heat, add dates, peanut butter and coconut milk and whisk until blended
  4. Remove from heat and mix in all remaining ingredients (waiting to add the chocolate until last)
  5. Pour into tart
  6. Bake for 18-20 minutes
  7. Cool thoroughly
  8. Cut into squares
  9. Enjoy!

Tuesday, 12 November 2013

Zuch-agna Rolls and A Warm Slice of Apple Pie

Today was a day for experimentation! I have been playing around with substitutes for pasta (my comfort food) for a while now, but had yet to tackle lasagna. 

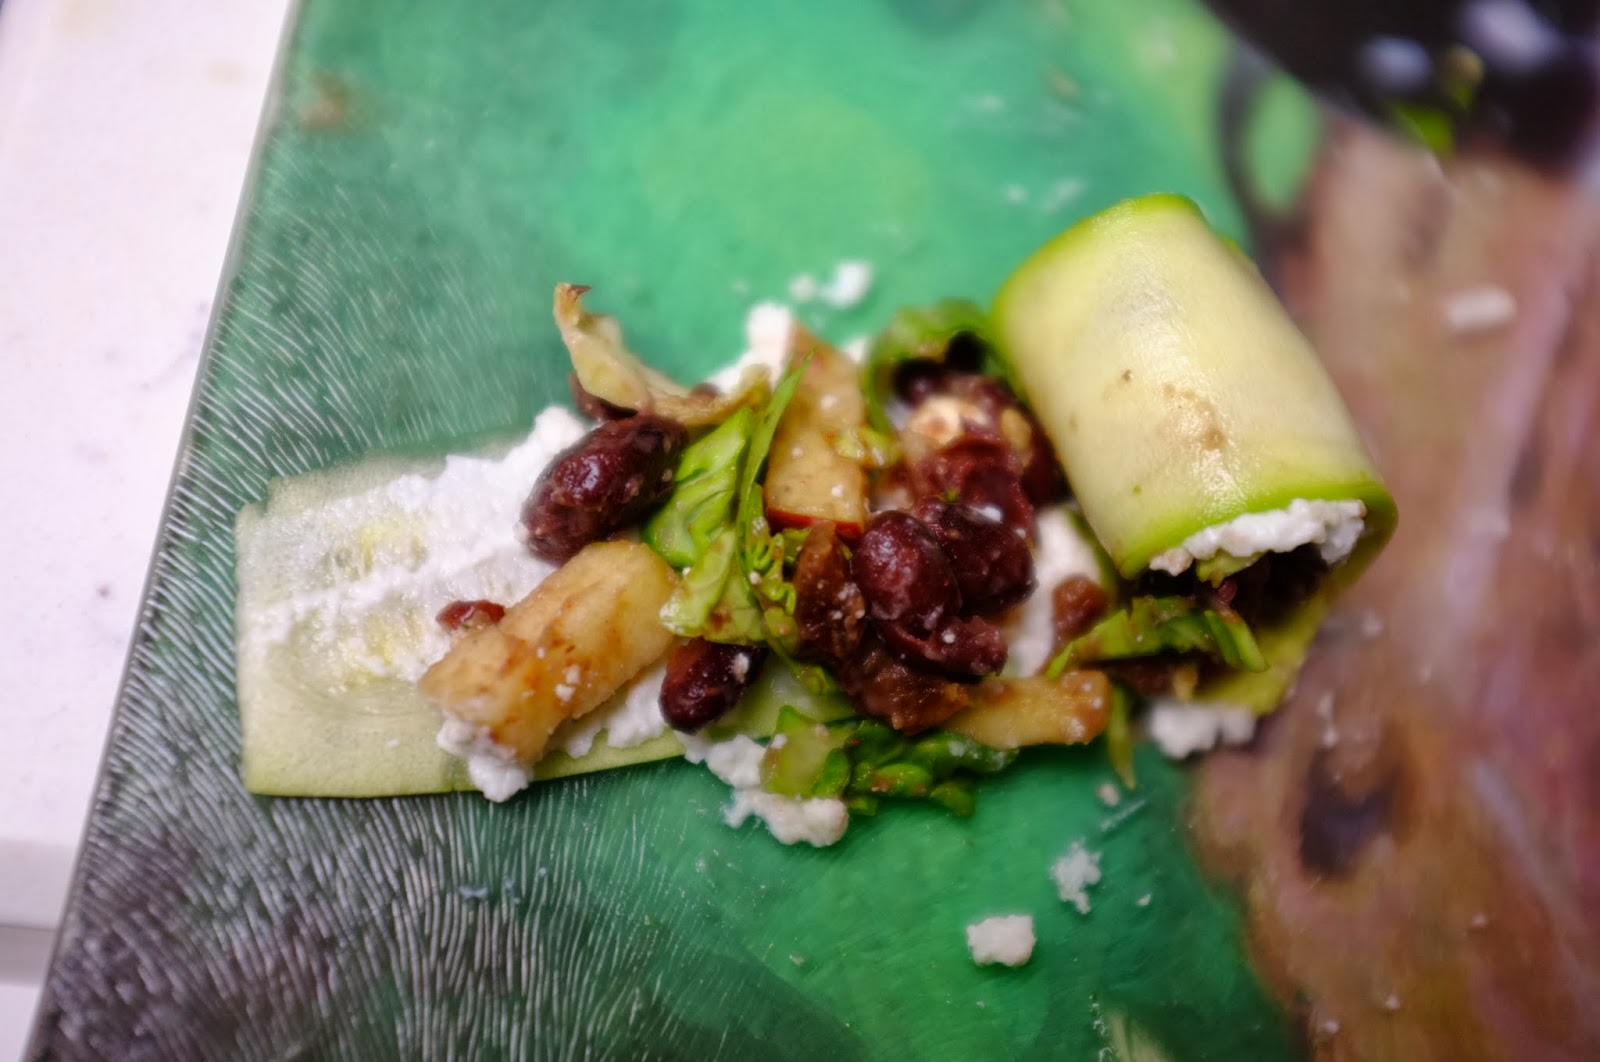
I initially intended to make a zucchini noodle lasagna, but decided to use up some of the ingredients in my fridge and ended up with these gorgeous little black-bean roll-ups instead. 

These rolls use zucchini in place of noodles for what I feel is a pretty light meal. I filled mine with black beans, apples, apricots, a pepper and brussel sprouts for a good mix of sweet, hot and salty flavours.

Because dinner was so light, and also because I found a bag of Spy apples (my fave for baking) at the grocery store across the street, I decided to make an Apple Pie for dessert. 

Hahaha - don't laugh! I almost published this without typing up my recipes. Was sitting here wondering why the post was looking so short and then something clicked. It might help to actually add my recipes!

I hope you enjoy - let me know what you think of the pie! Gluten free crust is always a challenge. This one had a great texture in my opinion :) Nothing tastes exactly the same as gluten-full pie sadly! I used millet flour in this attempt which was quite distinctive but tasty nonetheless. Next time I will try something milder (and make a raspberry pie - my favourite, but the Monk prefers apples) :)

Zuch-agna Rolls

Filling Ingredients:
1/4 cup apricots (preferably unsulphered), rehydrated in boiling water for 15 mins 
zest of one lemon
1 hot pepper, chopped finely (I used a habanero pepper)
handful mint, choped
2 cups black beans (cooked)
juice of 1/2 lemon
1 apple, chopped finely (I used a Spy apple)
1 1/2 cup brussels sprouts, chopped
1/4 cup feta, chopped
1/2 tsp paprika
salt to taste

Zucchini Noodles:
2 Zucchinis peeled into noodle slices with the vegetable peeler (I got about 30 usable slices)

Ricotta cheese (preferably fresh) - I used about half of a 500g container

Salsa to serve

  1. Preheat oven to 350 degrees
  2. Mix together filling ingredients
  3. Spread thin layer of ricotta cheese on zucchini noodles
  4. Spread filling over the ricotta cheese
  5. roll up tightly (as shown below)
  6. Bake  for 30 minutes
  7. Serve with Salsa drizzled on top
Apple Pie

Crust:
2/3 cup millet flour
2/3 cup amaranth flour
2/3 cup brown rice flour
1 1/2 tsp xantham gum
1/2 tsp salt

1/3 cup coconut oil
1/3 cup butter

3-4tbsp cold water

Filling:
6 cups Spy Apples, peeled and cut into slices (about 12 per apple)

1/4 cup coconut sugar (or more to taste depending on how sweet you like your pie)
juice of one lemon
1 tsp cinnamon
1 tbsp cornstarch

  1. Preheat oven to 350 degrees
  2. Mix together all filling ingredients in a bowl
  3. Mix together flours, xantham gum and salt
  4. Cut in butter and coconut oil until crumbs are formed (I do this by rubbing the butter into the flour gently with my hands, but you can use a pastry blender
  5. add just enough cold water that the dough forms into a ball
  6. Separate dough into two balls (1 slightly larger than the other - this will be your bottom crust)
  7. Roll out larger ball of dough and line pie tin (I like to roll on plastic wrap for easy transfer - and best of all no sticking)
  8. Fill with apple filling
  9. Roll out smaller dough and cover pie, pinching crust edges together
  10. Bake in oven for ~45 minutes until golden 


Monday, 11 November 2013

Chewy Zucchini Cakes

I've been entirely uninspired in the kitchen lately. I've been struggling to make some decisions about what to do next with my life and have sadly been doing very little cooking experimentation as a result. 

I've also been trying to cut back on my baked goods, I admit, possibly the bigger factor here!

This weekend, I decided I wanted some cookies and set out to make something interesting and new. I started throwing ingredients I liked into a bowl haphazardly and ended up with these cakes instead. They are nowhere close to cookies, but they hit my craving for something sweet and the Monk requests that I make them again soon.

I made these cakes in muffin tins but the consistency is more like brownies (minus the chocolate) than muffins. I might try them in tea cake moulds next time :)

Enjoy!


Chewy Zucchini Cakes

Dry Ingredients:
1/3 cup Sorghum flour
1/3 cup amaranth flour
1/3 cup quinoa flour
1/3 cup tapioca starch
1/4 cup coconut sugar
1 tsp cinnamon
1 tsp baking powder
dash salt

Wet ingredients:
1/3 cup finely grated zucchini (I used a zester)
3 medjool dates, chopped finely
1/3 cup coconut milk
1 chia egg (1 tbsp chia seeds whisked in 3 tbsp of water until jelly like)
1/4 cup coconut nectar
1/4 cup olive oil

Add ins:
1/3 cup cocoa nibs

  1. Preheat over to 350 degrees
  2. Mix dry ingredients
  3. Mix wet ingredients
  4. Mix wet ingredients with dry ingredients
  5. bake for 30 minutes
  6. let cool thoroughly
 

Thursday, 24 October 2013

Cat Approved Kale Chips and Celeriac Noodles

Everyone in our family loves Kale - even the cat it seems. Guess he's trying to make a statement that I'm not giving him enough greens, because I turned my back for all of 30 seconds and came back to find him chowing down happily on the kale. 

This is no aberration for him - I used to buy these nice containers of sprouts fairly frequently. Sadly, I have yet to taste even one sprout from the lot- I would leave the plants sitting on the counter and within an hour all sprouts were residing in his happy belly.

 I could not let that happen to my kale (at least not all of it) as it was destined for these awesome looking kale chips from Hallie's fabulous Daily Bites Blog.

I fully intended to make them exactly as written, but to my horror discovered that my tahini jar was covered in mould! Has this ever happened to you? It was a first for me and the jar is only a couple months old - bizarre! At the last minute, I ended up subbing sunflower seed butter for the tahini.

They were delicious anyway and I will definitely make them again (perhaps when I actually have tahini). Next time, however, I will reduce the salt a little and add a pinch of chili powder or cayenne. We used 3/4 tsp but it was a little salty for our tastes (this is 100% preference here as we aren't really used to very salty things). Next time I will try 1/2 a tsp instead. 

I love, love, love Hallie's recipes! Every one is sure to be a hit :-)

For dinner, I was inspired by Sarah's My New Roots blog and her recipe for Celeriac Pasta With Puttanesca Sauce. I have seen posts for zucchini noodles, butternut squash noodles and more, but never celeriac noodles before. How could I not try it (especially with pictures as pretty as Sarah's to entice me)?

I made the recipe pretty much exactly as written, adding in an extra tsp of crushed chili flakes as I was craving some heat. The recipe is simple, but oh so good :) Celeriac noodles are pretty awesome and I will most certainly be trying them again, although next time with a mandoline. This time I used my julienne peeler, which was a huge pain (very time consuming and I also managed to peel my fingers).

I was surprised that even my gluten eating family were a fan of the celeriac noodles, noting that they liked the texture and taste. These are definitely something I'd like to experiment with more :-).

Yum! Pasta without the heaviness - what could be better?


Tuesday, 22 October 2013

An Amazing Getaway to Portland

Enjoying a meal at Prasad
Being back from our amazing trip to Idaho and Portland doesn't seem quite real. We had a week-long getaway filled with friends, fab food and TONS of hiking. In just a week, we were able to fit in 4 full day hikes. I almost feel like I need a vacation from vacation (as I always do).
Juniper Gulch

We started our trip visiting friends in Idaho for a couple of days. We had a great visit complete with chamber music and a hike to Juniper Gulch (the hike actually ended up being in Oregon). I've never been to a desert state before so I was dazzled by some of the breathtaking terrain.


Our hosts, Laurie and Marv, were incredible going out of their way to provide healthy gluten free and vegetarian food! I have never eaten so well on a vacation before - what a treat!!!


Views from our hike to Cape Lookout
We then headed to Portland for the rest of our trip. Too short as always!!

We took a roadtrip to squeeze in some hiking on the coast, in the Columbia Gorge and near Mount Hood. 

Starfishes Galore at Pacific City
After hiking on the coast, we drove to Pacific City where it was low tide. We had fun scouring the tide pools for signs of life, finding crabs, fish and starfish in abundance!

From Pacific City, we headed back to Portland for the night before setting out for the Table Mountain Loop Hike the next morning in the Hood River area! After our hike, we rushed to the Naked
Descending after our hike to the Table Mountain
Winery for some last minute tasting. I'm still very sad that this winery does not ship to Canada. I really love their wines. After tasting 16 different varieties, we checked into the Hood River Hotel - our second stay with them and dined at a great local restaurant that starts with a C (I sadly can't recall the name at the moment).


Next we headed to the Lolo Pass to hike to Bald Mountain for some incredible views. 

This year, we were lucky enough to stay at the Timberline Lodge - simply gorgeous both inside and out! I highly recommend a stay there if you have the opportunity.

Amazing to see that the top of Mount Hood was still covered in snow. Last time we visited in July we were hoping to do some hiking at higher elevations. Unfortunately, at that time, the weather was such that there were still skiers out on the slopes making hiking less than ideal!!!!

This year in Portland, we discovered a wonderful gluten free vegetarian restaurant called Prasad, nestled inside a Yoga studio in the Pearl district. I admit that we managed to eat there 4 or 5 times on this trip.  How many times do I get to experience a place where I can eat almost everything on the menu!

I am slightly ashamed to confess that I took over 1,000 pictures on our vacation, which made parring down the shots for this post incredibly hard.  

Here are some of my favourites!
Views from our Hike to Cape Lookout
Views from our Table Mountain Trek
Wine Tasting at the Naked Winery
Beautiful Mount Hood
The Timberline Lodge
Mount Hood from the Timberline Lodge


Thursday, 10 October 2013

Dinner Inspiration Courtesy of Green Kitchen Stories

Tonight I made this rice, kale and aubergine pilaf from Green Kitchen Stories. Of course, my pictures are nowhere near as beautiful as David and Luise's. I love the Green Kitchen Stories blog and their cookbook too. The recipes are flavourful and creative and, while not entirely gluten free, easily adapted to be. Best of all, for me at least, this is creative vegetarian cooking at its finest. I have thrown many a dinner party that featured recipes from the Green Kitchen Stories blog or cookbook. Their recipes are so good that you don't have to try them first before experimenting on guests.

Eggplant (aubergine) has never been my favourite vegetable (in fact many know that it is my least favourite), but something about this recipe made me decide to give it a try anyways. It may have helped that I have never tried a recipe on Luise and David's blog that has flopped.

The recipe doesn't call for it, but I like to salt my eggplant prior to cooking. What that means is that I cut my eggplant according to the recipe directions and then toss the pieces with about 1/2 a tablespoon of salt per eggplant. I then let it sit for an hour or longer and just prior to cooking rinse thoroughly in cold water and pat the excess water out with paper towels. I find that this vastly improves the taste and texture of eggplants.

I am very glad I let Luise and David decide on dinner tonight. The flavours were a perfect mix of sweet, sour and spicy with a great mix of different textures. I did not have black rice in my cupboard so I used a wild rice mix (mostly brown really) so mine was not as pretty. It was still delicious and no one could tell that there was any eggplant at all!


Jewelled Basmati Rice

I have been procrastinating for days about writing this post and for that I apologize. I snapped my pictures and took my notes Monday evening but one thing after another came up and I never got around to posting. Now its already Thursday - only 2 more sleeps before we fly out to Idaho and Portland for a week of wonderful food, hiking and fabulous company!! I, still, have yet to even think about packing, but I knew if I didn't get this out now, I might never and that would be a shame because this meal is simple and delicious. Besides if I don't post some food, you might all think I exist on cookies and protein powder!

Sometimes when I am feeling lazy and don't want to tackle anything too complicated I make us a simple one pot rice dish. This happens far more often than I like to admit, but the result is always delicious. The flavours and add-ins for this meal are forever changing but lately I've been in the mood for the smell and taste of saffron. 

This week I ran out of pretty much everything vegetable-wise and as we are heading to Portland next week didn't want to stock up on more. I always keep some pre-soaked and cooked lentils and beans in the freezer so I decided to make this delicious meal of rice. I threw in some mung beans and green peas while the rice was cooking and added in some toasted pistachios and golden berries at the end for flavour and colour! Tasty and beautiful - just the way I like it.

I always like to pre-soak my rice for somewhere between 30 minutes to a couple of hours as it quickens up the cooking time. This is also supposed to make the grains easier to digest though I think for health benefits soaking is really supposed to be more on the order of 8 hours+! Maybe next time if I plan in advance I'll soak overnight.

Jewelled Basmati Rice 
1 TBSP coconut oil
2 Bay Leaves
5 Black cardamom pods (remove before eating, because biting into one of these is THE worst)
1 or 2 shallots, chopped
1/2 tsp saffron (expensive but worth it)
3/4 tsp salt
1 1/2 cup water
1 cup rice
1/2 cup pre-cooked mung beans
1/4 cup green peas frozen
1/4 cup pistachios
1/4 cup golden berries (or cranberries or currants)   

  1. Heat coconut oil over medium to high heat.
  2. Add bay leaves and cardamom pods and swirl around for 30 seconds until fragrant.
  3. Add shallots and saute on medium heat until golden around edges (around 5 minutes).
  4. Add saffron and stir to coat.
  5. Add rice, mung beans, green peas, water and salt.
  6. Bring to a boil over medium to high heat and cook for 5 minutes.
  7. Stir once, cover and turn heat to low. Cook for another 10 minutes. Right before the end add in pistachios and golden berries.
  8. Keep rice covered for 5 minutes, then fluff with fork and serve.


Sunday, 6 October 2013

Banana Chocolate Chip Pancakes

I've been playing around with a pancake recipe of my very own for quite some time now. For some reason, my experiments before today never seemed to come out quite right. Too dense, too hard to flip, or just too healthy tasting. I never realized before how much I rely on eggs to create perfect (flippable) pancakes. 
 
After a lovely girls evening out yesterday courtesy of my dear friend Kate, I was refreshed and ready to try again for Sunday morning brunch. These are the result and I'm excited to share them with all of you today.
 
I think these are perfect and so does the Monk who polished them off in record time. These pancakes are easy to flip, they don't fall apart and the taste is just what I was looking for.
 
I didn't have blueberries in the fridge so I used chocolate chips instead - just enough for a hint of chocolate.

We enjoyed these with a little maple syrup and in the Monk's case some cherry jam from Harrods. Next time I will serve them with a pile of berries :)

Banana Chocolate Chip Pancakes

Dry Ingredients:
1/2 cup buckwheat flour
1/4 cup amaranth flour
1/4 cup tapioca starch
1 tbsp chia seeds, ground
2 tsp baking powder
1/4 tsp salt

Wet Ingredients:
1 banana, mashed
1 cup milk (I used homemade macadamia nut milk using this recipe with a 3:1 ratio of nuts to water)
1 tsp vanilla
2 tbsp coconut oil, melted

Add-in:
2 tbsp chocolate chips

  1. Mix together dry ingredients
  2. Add in wet ingredients and mix well
  3. Add in chocolate chips
  4. Pour batter in 1/4 cup amounts onto a heated skillet.
  5. Cook pancakes until bubbles appear on the surface.
  6. Flip with spatula and cook until golden on other side.